
Hello lovely people.
Firstly let me say thank you for all your lovely comments regarding our recent furniture endeavours. As I sit here typing I am enjoying the pretty and colourful crafty things that are in the corner of my eye. Goading me to make more and share more, so with that in mind I am going to share another of my little patterns.
You may remember my train journey a while back where I happily watched the countryside whiz past whilst hooking some cute little coasters?
Well I promised on that post that I would share my flat flower pattern.
Flat is important to me...remember the hexagons? Flat crochet items make great embellishments, home decorations, blankets, scarves etc. I love crochet flowers, all of them, but I find sometimes that they are just too fiddly or time consuming, especially when my brain is tired or not functioning to the best of its ability and I need something simple, soothing and pretty. Pretty crochet leads to satisfying crochet.
Before Christmas I was asked to make a flowery scarf from a customer on my FB page. There were no specific instructions so I had free reign over design. I took inspiration from pinterest, but do you think I could find a pattern that satisfied my simplicity? Nope. So in situations like these there is only one solution. Make your own.
As I have said before, we all sit there and work hard creating something we think is unique only later to find that someone else has already done it, so if a wonderful person already has a similar pattern then I promise this is not from anyone elses.


LAST ROUND...
CH1 and turn your work.


TA DAHHHH!


Happy Friday x
Well I promised on that post that I would share my flat flower pattern.
Flat is important to me...remember the hexagons? Flat crochet items make great embellishments, home decorations, blankets, scarves etc. I love crochet flowers, all of them, but I find sometimes that they are just too fiddly or time consuming, especially when my brain is tired or not functioning to the best of its ability and I need something simple, soothing and pretty. Pretty crochet leads to satisfying crochet.
Before Christmas I was asked to make a flowery scarf from a customer on my FB page. There were no specific instructions so I had free reign over design. I took inspiration from pinterest, but do you think I could find a pattern that satisfied my simplicity? Nope. So in situations like these there is only one solution. Make your own.
As I have said before, we all sit there and work hard creating something we think is unique only later to find that someone else has already done it, so if a wonderful person already has a similar pattern then I promise this is not from anyone elses.
The scarf and wrist warmers made to order.
Can you see how lovely the flowers sit together and piled on top of one another? This is one of my most favouritist patterns and I am so happy to be sharing it with you.
First off. I work in US terms
ST= Stitch
SS= SS UK
CH= CH UK
SC= DC UK
DC= TR UK
I am using Drops Merino for the turotial and a size 4.5mm hook.
You see, it is flat.
To begin magic ring or if you just can't(like me) then ch2.
This shows your first ch.
DC 14 into the first ch. Join to beginning ST as shown.
CH 3+1 (this counts as your first DC, CH1), DC into same ST, CH1
You will have your first V stitch.
*Skip next ST. DC, CH, DC into next stitch* (shown above)
Repeat from * a further 5 times. 7 V stitches.
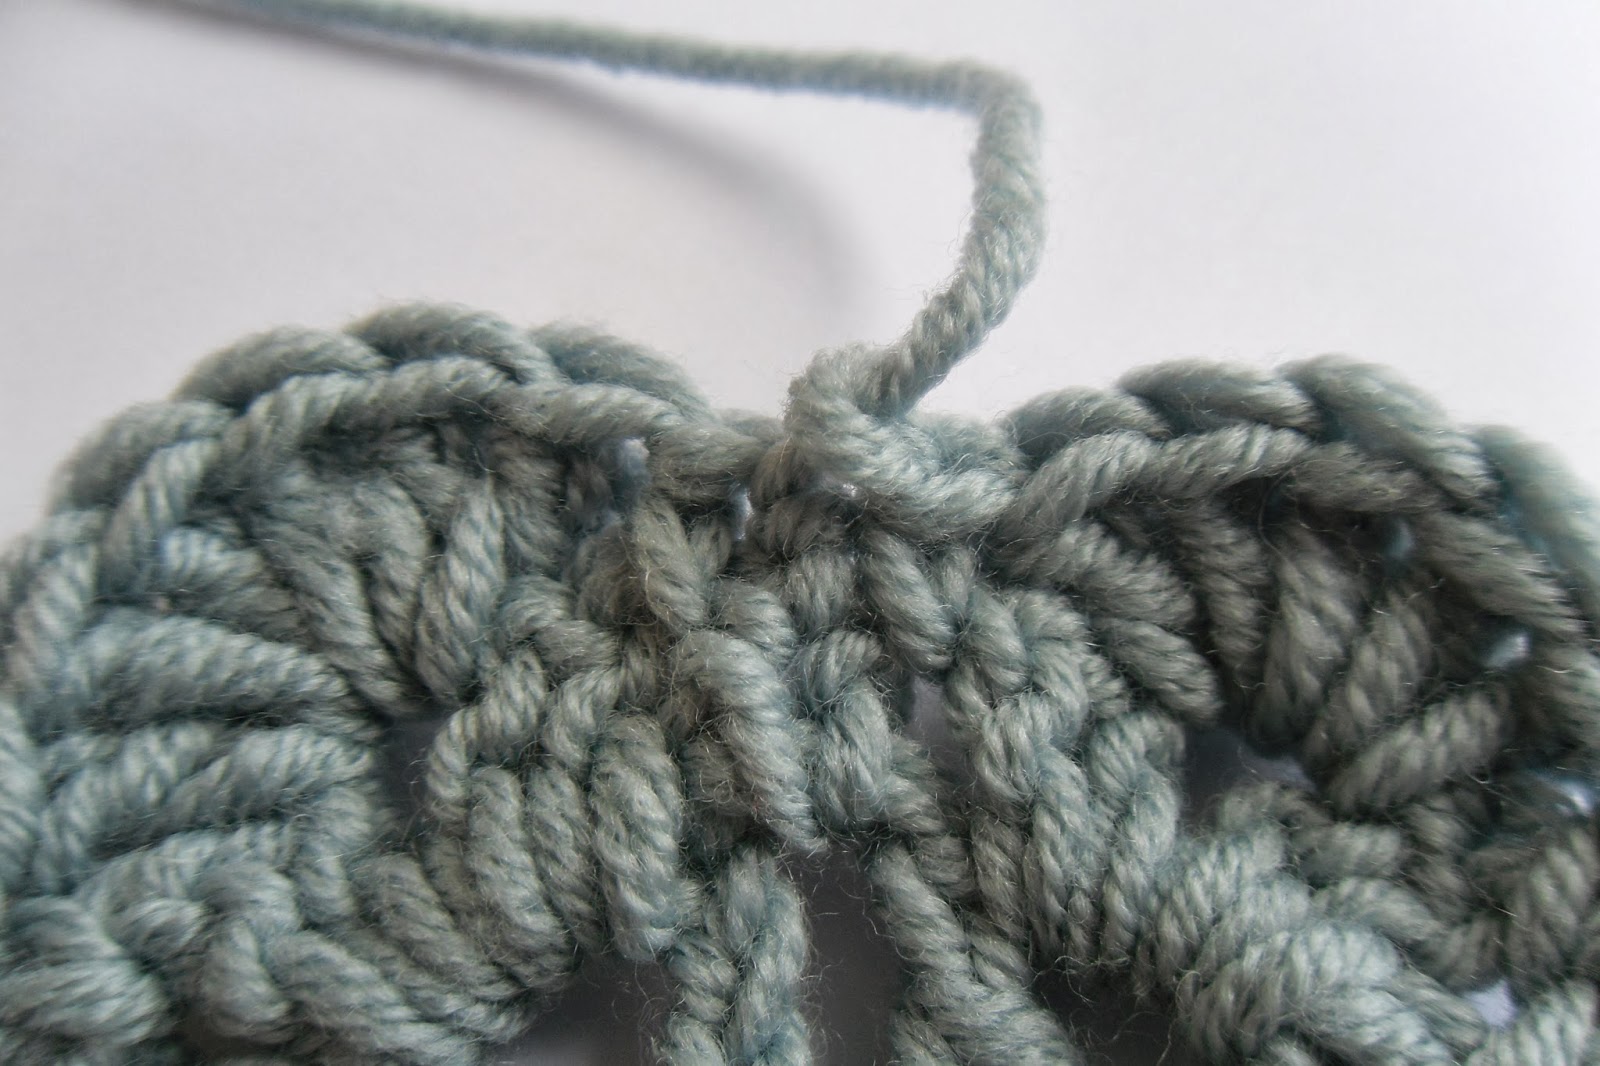
Join to beginning CH. You have to count up 3CH to find where you are joining your work. I have shown in the photos below how to do this. You have a plait type pattern when you chain and all you have to do is count up.
1 CH
2CH
3CH. Once you have joined, CH1 and turn your work.
This is the space in-between the V stitches.
1SC in this space.
In the V stitch *2DC, CH1, 2DC. SC into CH space*
You should now have a little petal mountain like above. Repeat from *to* 6 times, but do not SC after the 7th petal.(7 petal mountains)
Instead of SC at the end SS into the first SC stitch.
This is where we are up to. Isn't it wonderfully flat and perfect for sewing onto that cushion, bag etc? You can leave it here for a smaller flower and/or small coaster(if using as coaster or bunting I advised a little starchy after care. I use spray starch. Pin to a rolled up towel so all is flat and happy and spray starch all over the flower. Leave overnight to dry)
CH1 and turn your work.
SC in the space between the SC(SS for the first one) and the DC.
The needle is where you need to SC, the red hook is the CH space of the petal from previous round. I will quickly run through the pattern again in a second.
In the CH space of the petal mountain DC 5 times.
You then SC in the space between DC of previous round and the SC. The needles are placed where you need to SC.
It is a little blurry but I want you to see where the SC are.
The pattern for this again is
*SC, 5DC into CHsp at top of petal, SC*
Repeat to end
SS into top of first SC.
Cut ends and pull through. Then you just have to sew in your ends.
A Fabulous, Flat, Crochet Flower!
Now again, I am not little Miss Expert when it comes to patterns or tutorials so please, if you do try this and you have any problems then let me know so I can fix them x
This is what I did with that little flat flower. I needed a good mug of coffee before I sat down to write this.
Can you see that little crochet hook holder sneaking its way into the photograph? This was a gift made for me by the lovely Jacquie at Bunny Mummy.(Told you I still have it Jacquie) Jacquie and I became blogging friends many moons ago when I had my original blog
I would like to say a huge CONGRATULATIONS to Jacquie as well for your fab piece in Simply Crochet magazine xxxHappy Friday x
Happy Friday to you too! Lovely crochet flowers I know I will find your tutorial really helpful in the future thank you for sharing x
ReplyDeleteSo pretty! Thank you for the detailed tutorial. I think your flowers are gorgeous.
ReplyDeleteBlessings,
Betsy
I will def have a go at these, thanks for the tutorial.
ReplyDeleteHelenxx
Such pretty flowers, thanks for sharing, the scarf looks lovely too
ReplyDeleteClare xx
Love love love these! Just gorgeous, I love the pretty scarf and embellished mittens too. Thank you for sharing your tutorial, I will definitely be trying these.
ReplyDeleteMarianne x
Hi Emma, I'm impressed as I can't crochet at all! The flowers look do cool.
ReplyDeleteBeautiful, Emma :) if only I could crochet!!
ReplyDeleteThey're really pretty and this is an excellent tutorial. Thank you for sharing.
ReplyDeleteGoodness is this just beautiful! Your tutorial is amazing...I have much to learn when it comes to yarn!!!! I am trying...the problem is I want to try them all and have to stay focused!!! Thank you for inspiring me! A lovely weekend to you!! Nicole xoxo
ReplyDeleteThey are uber cute :-)
ReplyDelete